April in the Kitchen – Teriyaki Salmon with Spring Vegetables

April in the Kitchen – Teriyaki Salmon with Spring Vegetables

Did you ever think there could be a “healthy” teriyaki sauce? Certainly one without MSG is making progress. But, what about one without granulated sugar? Impossible! Well, I’m going to give you an alternative…dates, yes dates. This sauce consists of medjool dates as the sweetener. What a brilliant idea, don’t you think? Simply soak them in warm water for a few minutes, then dump them with some garlic, ginger, soy sauce and rice vinegar into the jar of your blender. Puree all of them together with some of the soaking water from the dates until smooth. That’s all there is to it. It goes together very quickly.

I’m sorry to say I didn’t invent the sauce. I saw it in a post on the blog “A Pinch of Yum” for 30-Minute Sesame Mango Chicken. It was too good to pass up. If you are not familiar with that blog, it’s worth a visit as she posts some great recipes, many of them healthy and vegetarian.

This is a thicker sauce than my own “old” favorite using maple syrup. You’ll find that recipe here from an earlier post in February of this year.

I marinated some wild caught salmon steaks (the first of the season) in the sauce, then sautéed them quickly. They were still slightly pink in the middle, just the way we like them. Served with a quick stir fry of asparagus and snap peas with a spoonful of roast garlic lemon butter it was a quick and delicious mid-week dinner. You’ll find the recipe for the roast garlic and lemon butter here.

Salmon Steaks in Teriyaki Sauce

Salmon Steaks in Teriyaki Sauce

 Teriyaki Sauce

  • 15 Medjool dates, pitted and soaked in 1/2 cup of very warm water for 30 minutes
  • 3/4 cup soy sauce, regular or low sodium
  • 1/4 cup rice vinegar
  • 3 cloves of garlic, peeled
  • 1 tablespoon fresh ginger, minced or grated
  • Optional – pinch of red pepper flakes
  • Optional – 1/4 cup sesame oil 
Dates

Medjool Dates

  1.  Soak the pitted dates in the hot water
  2. Dump the dates and rest of the ingredients (including the soaking water) into your blender and blend until very smooth.
  3. Pour into a container until ready to use.
Teriyaki Sauce with Dates

Teriyaki Sauce with Dates

This will keep in the fridge for at least a week, we found it got “hotter” and spicier the longer it sat.

Teriyaki Sauce

Teriyaki Sauce

Grilled or Sautéed Salmon with Teriyaki Sauce

I sautéed the salmon steaks but they would be equally wonderful on the BBQ.

  1. Marinate salmon steaks or fillets in the sauce for at least 30 minutes or up to an hour in the fridge.
  2. Heat 3 tablespoons of peanut or other vegetable oil in your skillet on medium high heat.
  3. Add the salmon, skin side down.
  4. Saute on medium high heat for about approximately 10 minutes total for every inch of thickness. We like our salmon on the rare side and they weren’t quite so thick, so I started the steaks skin side down and turned them after 4 minutes.
Wild Caught Salmon

Wild Caught Salmon

Asparagus and Snap Peas with Roast Garlic and Lemon Butter

  • 1 bunch of asparagus, ends snapped and cut into pieces about the length of the snap peas. I used a spiral diagonal cut, turning the stalk a half way round after each diagonal slice. That exposed more of the inner part of the stalk to the heat, cooking is a bit faster.

    Asparagus

    Asparagus

  • About 3-4 cups of snap peas, stringed if necessary and cut in half lengthwise

    Snap peas

    Snap peas

  • 4 scallions, cleaned and cut in half lengthwise, then into pieces the same size as the asparagus and peas.

    Snap Peas and Scallions

    Snap peas and scallions

  • 2 tablespoons of roast garlic and lemon butter, (or 2 garlic cloves, finally minced, plus the zest and juice of one lemon, and 1 tablespoon of butter)

    Roast garlic and lemon butter

    Roast Garlic and Lemon Butter

  • 2 tablespoons of olive oil
  • Salt and pepper to taste
  1. Heat the olive oil in a large skillet on medium low heat.
  2. If not using the roast garlic butter, add the minced garlic to the pan and saute until softened but not brown.
  3. Add the asparagus to the pan and turn up the heat to medium high. Saute for about 4 to 5 minutes until bright green and beginning to soften.
  4. Add the snap peas to the pan and saute for an additional 3 to 4 minutes until everything is bright spring green and slightly softened but still crisp.

    Asparagus with Snap Peas

    Asparagus with Snap Peas

  5. Finish with the roast garlic butter or add the lemon zest and juice plus the tablespoon of butter. Continue to heat until everything is coated with sauce.
  6. Add salt and pepper to taste and serve.
Asparagus and Snap Peas

Asparagus with Snap Peas and Roast Garlic/Lemon Butter

Salmon, asparagus, and fresh peas…this meal is the essence of spring. What are you serving to celebrate the season?

I’m taking this to share on Fiesta Friday #66 hosted by Angie. If you would like to see what is on the menu, come pay a visit to the party.

Fiesta Friday

Fiesta Friday

March in the Kitchen – Swiss Chard with Pickled Stems

March in the Kitchen – Swiss Chard with Pickled Stems

Not wasting any part of a vegetable would not have been a new idea for many of our parents or grandparents. It was simply considered good household management. My mother kept an empty milk carton in the freezer, in would go all the vegetable trimmings and any leftover bones. When it was full, she made stock or soup. She even used leftover salad, the next day it was popped into the blender with a can of cream-of-something soup, pureed, heated with a can of milk, and served to my dad for lunch. He thought it was delicious.

Today the hottest current trend in restaurant circles is using all parts of a vegetable (or animal). Sound familiar? Everything comes around again if you wait long enough. I am in full agreement with this new idea. Especially when it’s been grown in my garden from a seed. I’ve nurtured it from babyhood and I want to savor every part.

At the moment my garden is gifting me with armfulls of chard in many colors.

Rainbow Chard

Rainbow Chard

Can’t you just see the vitamins?

One of the most creative books on preserving in my cookbook library is “THE PRESERVATION KITCHEN The Craft of Making and Cooking with Pickles, Preserves, and Aigre-doux” by Paul Virant. On the fly-leaf of the book Alice Waters writes “In order to cook economically and deliciously all year round, it is essential to learn the art of preservation. This beautiful book inspires us to take the time to capture the flavors and textures of each harvest.” Amen.

Chard stems

Chard stems

Chard stems are rather forgettable when raw but are dynamic when pickled. They provide a sharp contrast to the chard leaves. This is a quick pickle, you can use it almost immediately after it is made although I find it lasts for at least a week in the fridge and you can certainly make it ahead.

Swiss Chard with Pickled Stems

  • 1/2 cup champagne vinegar
  • 1/2 cup water
  • 1 shallot, minced
  • 2 tablespoons honey
  • 1/2 teaspoon kosher salt
  • 1-1/2 pounds of Swiss chard
  • 2 tablespoons of olive oil
  1. In a saucepan large enough to hold the stems and pickling liquid, bring the vinegar, water, shallot, honey and salt to a simmer until the honey and salt have dissolved.
  2. Strip the leaves from the chard stems and cut off any tough ends. Dice the stems into 1/4 inch pieces.
  3. Add the stems to the pot. (If the brine doesn’t cover the stems it’s ok, they will soften in the brine.)
  4. Bring to a simmer and cook, stirring occasionally, for 5 minutes. Turn off the heat and let the stems cool in the liquid. If not using immediately, transfer to a bowl or jar and chill.
Pickled chard stems

Chard Stems in Pickling Liquid

When you are ready to cook the chard

  1. Roughly chop the chard leaves
  2. In a large pot over high heat, warm the olive oil. Stir in the leaves and a pinch of salt and saute until they begin to wilt.
  3. Using a slotted spoon, add the pickled stems to the pot, then spoon in half the pickling liquid. Cook until the chard leaves are soft and most of the liquid has evaporated.
  4. Taste, add more pickling liquid if you like a sharper taste. Salt if needed.
    chard leaves

    Chopped chard leaves

    pickled chard stems

    Pickled chard stems

    I don’t have a picture of the finished dish because it was eaten too quickly. Gone, inhaled. Try this one, I think you will like it. Any leftover pickled stems can be used as a garnish for scrambled eggs or added to a salad.


Janurary in the Kitchen – Braised Rabbit

Janurary in the Kitchen – Braised Rabbit

We don’t see rabbit much on restaurant menus in the US; it is more common in Europe. However Braised Rabbit is a personal favorite of mine and also popular with one of my best friends who was coming for dinner. Unlike widespread opinion, it doesn’t taste like chicken. It’s mild and clean tasting with a slight gaminess. The meat is very lean and needs to be treated carefully or it will be dry. I have found that it doesn’t have as much meat as a chicken and can be bony. One domestic rabbit will serve three people, four with small appetites.

Fresh rabbits are not in the main meat case at my local grocery store; you have to ask one of the butchers to fetch it from the freezer case in the back (behind the counter). Unfortunately they are frozen solid and whole. It was a bit intimidating encountering an entire bunny, which needed to be cut up BY ME after defrosting. I’m perfectly comfortable cutting up a chicken but a rabbit is entirely different. The first time was not pretty. My efforts on the second were better, helped by an instructional YouTube video. I’m continually amazed at how helpful the internet can be to cooks!

Rabbit

Rabbit

Rabbit Braised in White Wine and Sherry

Braised Rabbit

Braised Rabbit

  • 1 rabbit, cut into 8 pieces
  • 2 tablespoons of all purpose flour (I used gluten free)
  • 1 teaspoon salt
  • 3 tablespoons olive oil
  • 1 large onion chopped
  • 2 garlic cloves, chopped
  • 1 teaspoon Herbs de Provence
  • 4 sprigs of fresh thyme
  • 1 ½ cups of chicken stock
  • ½ cup of white wine
  • ½ cup of dry sherry
  • Freshly chopped parsley for serving
  1. Stir together the flour and salt in a large plastic bag or bowl. Add the rabbit and toss to coat.
  2. Heat the olive oil in a large heavy pot over medium high heat. When hot, shake any extra flour off the rabbit and add it to the pot (you will need to do this in two batches, do not crowd the pieces).
  3. Brown, turning once, until golden on each side. Remove to a bowl and brown the second batch, transferring it to the same bowl.
  4. Add the onion to the pot and cook until softened but not brown, about 5 minutes. You may need to turn down the heat to medium.
  5. Add the Herbs de Provence, thyme, and garlic and cook for 1 minute.
  6. Add stock, wine, sherry, rabbit, and any juices in the bowl with the rabbit.
  7. Bring to a simmer, cover, lower the heat to low, and cook (turning occasionally) until the meat is tender. This will take about an hour.
  8. Transfer the rabbit to a bowl.
  9. Simmer the sauce, uncovered, until it begins to thicken. 8-10 minutes.
  10. Return the rabbit to the sauce and simmer until heated.
  11. Transfer to a serving dish and garnish with parsley.
Rabbit

Braised Rabbit

It was delicious.

I served it with polenta, a green vegetable and salad. Fresh fruit, candied ginger, chocolates for dessert. Plus plenty of good wine, of course.

October in the kitchen – Slow Baked Chicken with Carrots, Turmeric, Cumin, and Coriander

October in the kitchen – Slow Baked Chicken with Carrots, Turmeric, Cumin, and Coriander

This recipe for roast chicken and carrots is a combination of two I clipped from the NY Times this year. The idea for slow roasting the carrots came from a column by Mark Bittman, and Martha Rose Shulman used the spice mixture in a recipe for “Roasted Carrots With Turmeric and Cumin” (she based hers on one by Suzanne Goin in the “The A.O.C. Cookbook”). Not much is entirely new in the kitchen! This combination of spices is addictive and I thought it would go well with chicken. It was a great success!

Slow Baked Chicken with Carrots, Turmeric, Cumin, and Coriander (Serves 4)

Slow Baked Chicken with Carrots

Slow Baked Chicken with Carrots

  • Two bunches of medium sized carrots, peeled and tops trimmed
  • 8 chicken thighs
  • 4 tablespoons of olive oil
  • Salt and freshly ground pepper to taste
  • 2 tablespoons of fresh thyme leaves
  • 1 tablespoon of cumin seeds, toasted
  • 1 tablespoon of coriander seeds, toasted
  • 1 tablespoon of turmeric
  • 1 tablespoon of Aleppo pepper or mild chili powder
  • 3 tablespoons of softened butter
  • ½ cup of fresh mint, chopped, as garnish

Preheat your oven to 325 degrees F. Place a large roasting pan in the oven to heat.

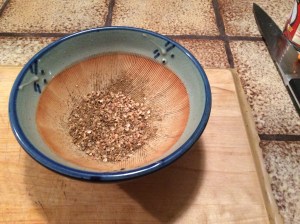
Toast the cumin and coriander seeds in a small skillet. Watch them carefully to make sure they don’t burn. Remove them to a small plate and cool. Once cool grind them in a mortar and pestle or mini food processer. Combine with the turmeric and chili pepper, then all with the softened butter. Set aside.

IMG_0130

Season the chicken thighs with salt. Heat 2 tablespoons of olive oil in a skillet over medium heat. When hot, add the chicken thighs, skin side down. Cook on medium to medium-high heat until the skin is golden brown and they release easily from the skillet. Turn and brown the other side. You may need to do this in two batches. Remove the thighs to a large plate or platter.

Toss the carrots with 2 tablespoons of olive oil and the fresh thyme leaves.

Without pouring off any oil, add the carrots to the skillet. Cook, turning them as they brown, until lightly caramelized all over. Remove them to the plate with the chicken.

Turn off the heat under the skillet and add the butter and spice mixture. Scrape up any crusty bits. Remove the hot roasting pan from the oven and add the contents of the skillet to the roasting pan. Add the chicken (plus any accumulated juices) and the carrots to the pan, turning to coat with the spice mixture. Try to spread things out so you have a single layer, keeping the chicken skin side up. Careful with the hot roasting pan, hold it with a thick potholder.

IMG_0105 Bake for one hour and 15 minutes, shaking the pan once halfway through, until chicken is cooked.

Add additional salt as needed and freshly ground pepper. Garnish with the mint leaves.